Friday, August 17, 2012

Efect Photoshop:Electrifying Energi Beams

Here's a great effect that will bring some energy to your subject. We'll be wrapping this singer's arm with a glowing beam of light, adding sparkles, and adjusting the colors to make it all seem magical.
Firstly, create a new layer, then grab your Pen Tool (P) and draw out a spiraling path, as if you have a snake wrapped around the arm.
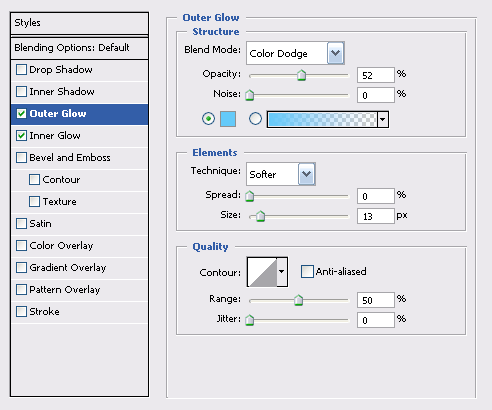
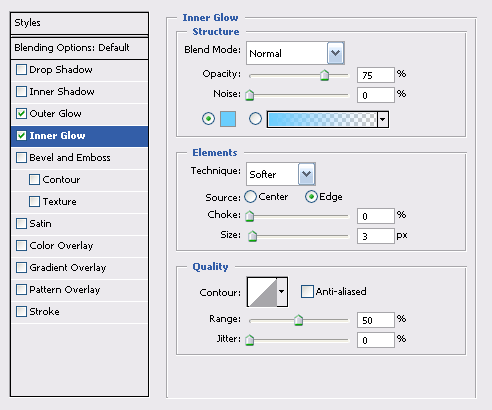
Then select the Brush Tool (B) and set your diameter to 7px, with the Opacity and Flow at 100%, and your foreground color set to white. With your path still on the artwork, go back to the Pen Tool, right click on the canvas, and choose "Stroke Path." A menu will appear with the Brush set as the Tool. Check "Simulate Pressure" and press OK. This will make the beginning and end of your stroke thinner.
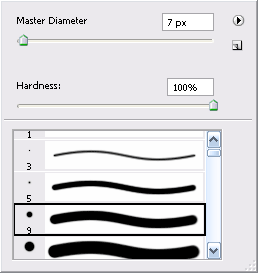
Now you need to delete the parts you want hidden behind the arm. With your stroke layer selected, choose "Add layer mask" at the bottom of the Layers Palette. Use the Polygonal Lasso Tool (L) to select areas of the arm you want in front of the stroke -- use your eye and imagine how this path will wrap around the arm. Make sure your mask is active by clicking on it, and fill these selected areas with black. They should now be cut out, appearing as if they're behind the arm.
Right click on your stroke layer and choose Blending Options. A Layer Style menu will appear, where you'll be adding an Inner and Outer Glow to the stroke, making the edges of it glow with a blue hue. Use the settings below:
Make a copy of your stroke layer and right click on the Layer Effects icon. Choose "Clear Layer Style" -- we simply want to blur this layer (about 6 pixels) to add another layer of glow. Everything's looking nice and illuminated here, so let�s add some sparkles. With your Brush Tool, add some quick spots around your glowing path with varying small brush sizes (3 - 5px). Make as many as you want here, as you're always free Erase undesired sparkles.
We're now going to make a secondary stroke to create another level of motion. Use the Pen Tool to go over your original path, but make it a bit different and overlap parts. Select a smaller diameter brush this time with a 50% opacity, and stroke the path as before.
Our energy beam is nearly there. To make the effect more dramatic, you can adjust the overall hue of your photo. Create a new Curves adjustment layer, and tweak the colors to get a vibrant blue atmosphere. Download the Curves preset below to load it in your document. After your colors are locked in, use the Dodge Tool (O) (with a diameter of 35 pixels and the exposure set to 25%) to brush in some highlights underneath your beam, directly on the background photo. This makes it appear as if your beam is casting light on to the arm.
Download blue.acv
For the last part of this effect, we'll add one more layer of shimmer. Hold down Ctrl and click on your main stroked path in the layers palette -- your path should now be selected. Go to Select › Modify › and Expand the selection by 7px, then feather it by 10px.
Now select your background photo layer and apply a Plastic Wrap filter, found in your Artistic filters. This will add some wispy lines around your path. Set the Highlight Strength to 20, the Detail to 6, and the Smoothness to 8. Finally, lightly Gaussian Blur your background layer with the feathered selection still active.

No comments:

Post a Comment

TV ONE